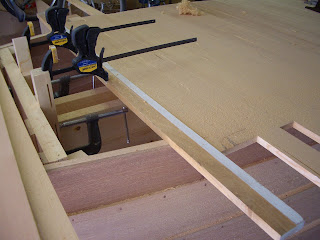
At first the prospect of planking seemed quite straight forward, joint the two edges of each board dead flat, apply a thin bead of Sikaflex, clamp the over hanging ends of each board securely to the previous plank until the fit is tight, counter bore a screw hole through the plank and into the chine, and then drive home a 1 ¼” stainless steel screw. Repeat until you reach the front of the boat, then cut off the overhanging pieces flush to the garboard plank.
Of course we agonized over planning a slight angle on each plank so that we would get a slight “v” between each set of planks. We understand that on many traditional boats this is standard practice and that these “v” joints would subsequently be chinked with cotton. But in the end we decided that a modern sealant like Sikaflex should provide similar performance characteristics to the old world methods, plus it would be a lot easier to implement.
We started at the transom and worked our way forward. The first plank was really easy, just line it up parallel to the transom and screw it down all the way around. The work progressed quite quickly for the first couple of feet until we encountered our first challenge—clamping the boards together. As we approached the 2 foot mark we realized that our 2 foot quick grip clamps would soon on longer be long enough to clamp the board together. You are probably thinking, “just get longer clamps”, and while that would an acceptable solution for a while it would not be a fix all as our longest clamp is 6’. Instead, we started to stagger the amount of overlap from side to side so that we would always have a point of purchase on each side. Although there were a few occasions where we ended up drilling a hole in the overhanging plank so we could get a clamp in place.
On the first day we decided to plank approximately 5 feet and then to put a couple of clamps on the whole set up to draw it up nice and tight as there were a few small gaps starting to form in the middle of the planks. To address any up/down crown or sagging in the planks we initially put light pressure on the clamps and then carefully knocked individual planks up/down until the whole area was generally quite flat. We left the clamps in place for several days to allow the Sika to set before proceeding with any further.
The next 5 feet were straight forward as we had established a good routine that quickly allowed us to put the bottom planks on. In fact we spent more time prepping the boards and selecting which boards would go where than actually installing them. We did come up with a good trick for clamping the next 5 feet set up together to close any small gaps that may have formed. We clamped a couple of 2x4’s to our molds that had a groove cut in it the exact size of the end of our quick clamps. Then by reversing our clamps to make them into spreaders we fit the other end into another small groove that we cut into our caul. The picture is worth a thousand words….
As you can see from the photos we trimmed the overlap excess in between the 2nd and 3rd sections of planking and started the process of hand planning the bottom to a smooth finish while the Sika set. The sides were first roughly cut off with a circular saw (being very careful!) and then fine tuned with a block plane. This was slow and arduous work slicing through end grain—again a sharp plane is invaluable for this type of work. The last plank was interesting, it was cut to fit snuggly against the stem and was generously slathered with Sika to prevent water penetration before it was forced in with a mallet. This effectively closed up any possible gaps that may have existed between the middles of the last section of planking.
We were extremely pleased with the final appearance of the bottom and were paid the highest of compliments when someone asked if the bottom was a single piece of wood.
With the bottom all done it was time to build the skeg—the sternward extension of the keel. The plans called for a piece of 7/8” softwood but now that we have it made I am considering building another out of hardwood as I am concerned about the durability of the softwood version. It was a little tricky to get the same curve on the bottom of the skeg as the bottom of the boat but after a little trial and error we managed a good fit. We elected to wait to install the skeg and the two bottom rub rails until after the bottom is painted. Hopefully, this will result a better layer of water protection than a bare wood to wood joint.
 |
| You can really see the curve in the bottom of the boat |
Joe Lapstrake


